


 |
Installation |  |
 |
FAQ's | |
 |
Trade Customers |
How to Remove a Freestanding Fireplace
Note: You may need an extra set of hands, especially for lifting the unit and handling the flue.
Step 1: Gain Clear Access to the Roof
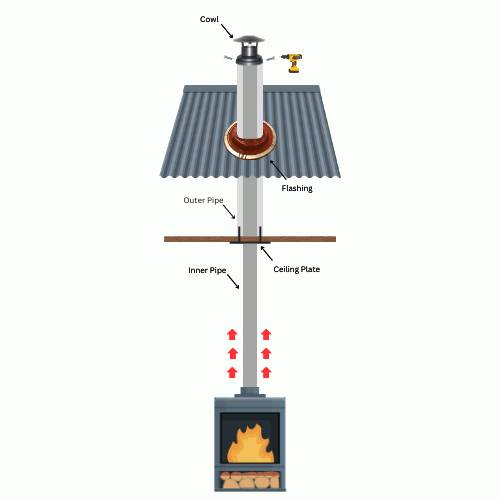
Before doing anything inside, make sure you have safe and clear access to your roof. The first component to remove is the cowl (also known as the top hat). This piece connects the inner and outer flue pipes together at the top of the system.
Important:
Do not push or move the flue from inside, before removing the cowl. Doing so can damage the roof flashing, which ensures the system is waterproof, and this may cause leaks.
Step 2: Remove the first length of Flue from Inside
Once the cowl has been safely removed, go back inside. From there, gently push the first length of flue pipe upward. This should loosen and release the fireplace unit from underneath, allowing it to be carefully lifted out.
Step 3: Remove the Fireplace
With the first pipe length pushed up, you can now remove the freestanding fireplace unit. Make sure the area is clear and that you have help if needed as these units can be heavy.
Step 4: Secure or Remove the Remaining Flue Pipes
Once the fireplace is out, the inner flue and mesh is no longer stabilised. We recommend removing the remaining inner flue pipes at this point to prevent them from scratching or falling. Keep them safely stored and ready for reinstallation if you're planning to re-install the fireplace later.
By following these steps you can remove your fireplace without causing damage to your roof or flue system. If in doubt, consult a builder or carpenter to assist with the removal.
Step 1: Gain Clear Access to the Roof
Before doing anything inside, make sure you have safe and clear access to your roof. The first component to remove is the cowl (also known as the top hat). This piece connects the inner and outer flue pipes together at the top of the system.
Important:
Do not push or move the flue from inside, before removing the cowl. Doing so can damage the roof flashing, which ensures the system is waterproof, and this may cause leaks.
Step 2: Remove the first length of Flue from Inside
Once the cowl has been safely removed, go back inside. From there, gently push the first length of flue pipe upward. This should loosen and release the fireplace unit from underneath, allowing it to be carefully lifted out.
Step 3: Remove the Fireplace
With the first pipe length pushed up, you can now remove the freestanding fireplace unit. Make sure the area is clear and that you have help if needed as these units can be heavy.
Step 4: Secure or Remove the Remaining Flue Pipes
Once the fireplace is out, the inner flue and mesh is no longer stabilised. We recommend removing the remaining inner flue pipes at this point to prevent them from scratching or falling. Keep them safely stored and ready for reinstallation if you're planning to re-install the fireplace later.
By following these steps you can remove your fireplace without causing damage to your roof or flue system. If in doubt, consult a builder or carpenter to assist with the removal.